1. Overview
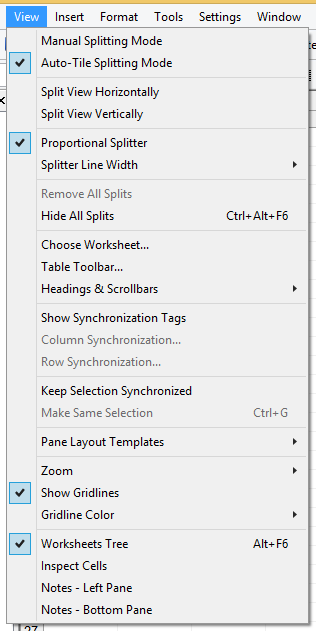
Splitted worksheet views can be synchronized so that scrolling columns or rows in one view automatically scrolls the corresponding columns or rows in other synchronized views. Synchronization commands are available through the View menu.
2. Automatic Splitting Mode
Views created in Automatic Splitting Mode are synchronized by default. They form a regular grid of views, and synchronization applies to:
- columns (within each column of views)
- rows (within each row of views)
This default synchronization cannot be disabled in automatic mode.
3. Manual Splitting Mode
Views created in Manual Splitting Mode are not synchronized initially. Users must explicitly toggle synchronization using:
- Column Synchronization
- Row Synchronization
In manual mode, synchronized views do not need to share the same first visible column or row. This allows synchronizing distant worksheet ranges that show different areas of the worksheet.
4. Toggling Synchronization (Manual Mode)
To toggle synchronization:
- Click the first view to synchronize.
- Use Column Synchronization or Row Synchronization.
- A message appears: “Click a view to toggle the column (row) synchronization on or off”.
- Click another view to add it to or remove it from the synchronization chain.
4.1 Synchronization Tags
If the Synchronization Tags option is enabled, synchronized views display:
- R — row synchronization
- C — column synchronization
Views belonging to the same synchronization chain use matching tag colors.
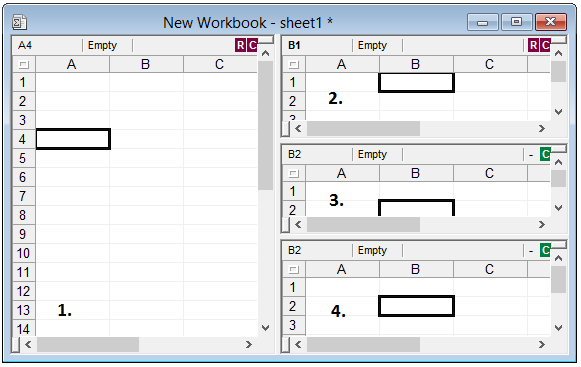
In the example above:
- Scrolling columns is synchronized between views [1] and [2].
- Scrolling rows is synchronized between views [1] and [2].
- Scrolling columns is synchronized between views [3] and [4].
5. Synchronizing Cell Range Selections
To synchronize cell selections across views, enable:
Keep Selection Synchronized
Selecting cells in one view will select the same number of rows and/or columns in synchronized views.
To perform a one‑time synchronization of selections, use:
Make Same Selection
Note: To quickly return to the origin of a selection, click the selection address in the worksheet/table window toolbar.