With GS-Base you can create tables/databases with all file paths and the related file details from folders and entire disks, with up to 256 million files in a single table. Using this functionality, you can, for example:
- scan, verify and monitor file changes on your disks, find changed files, new files and deleted files,
- add and maintain any type of file metadata for each file,
- view and search the automatically created history of file changes for each file,
- search for the same or similar files on your disks using regular expressions, search for duplicates, fuzzy searches,
- filter full paths, folders, file names, extensions, modification dates, access dates, file sizes, also using historical data,
- analyze large sets of files (sizes, duplicates, substrings in names/paths, dates) using, e.g., pivot tables,
- perform all of the above (and more) only for specific static lists of files you choose.
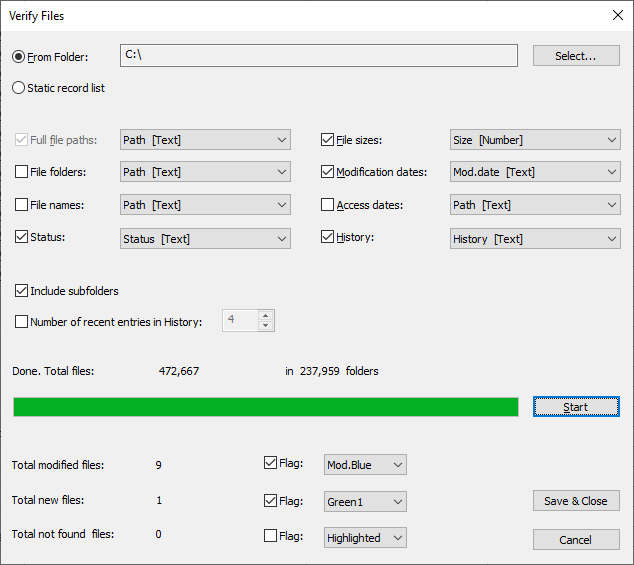


To verify/scan files in folders or disks:
- Enter the location(s) (folder(s)/disk(s)) to scan. Multiple locations should be separated by a semicolon (;), for example:
c:\folder1;d:\;e:\folder2
- Create a table with fields that will contain the file parameters you want to save and any other fields
you want to maintain for each file. The File path field must always be selected.
When you open the Verify Files dialog for the first time, the fields can be preselected if
their names contain the following substrings:
"path", "folder", "file", "ver", "size", "mod", "access", "history".
You can also later freely add or remove any fields, including calculated fields. - Click Start to scan a selected folder or disk. If you choose, e.g., an entire system partition with a large number of files and folders on a slower HDD disk, the process can take anything from seconds to minutes. As Windows caches already-accessed file information for some short period of time, if you start scanning the same location again, it'll be much faster.
- Click Save & Close to fill the table with the newly generated results, replacing the previous
ones. If you click Cancel, the table won't be updated.
Note: old entries are safe; none of the existing entries in the database table are removed until you manually delete such a record in GS-Base.
New files are added automatically. - To mark files as modified, added or deleted since the last verification, use either flags (font and background colors) that you can define using the Tools > Record Flags command, or use the Verification field that will contain one of the state strings "Modified", "New", "Not Found", or will be empty. Each new verification/scanning overwrites the previous flags and states.
- To save subsequent size or modification date changes for files, select the History field.
Each such change detected during verification will be added as a new line in that field (and
the row heights will be adjusted automatically) in the following form:
On [date], size: ... mod: [date]
Older entries are moved to the lines below within a table cell. If you want to keep them in one line, click the column, then in the Find edit field on the Find toolbar enter (using the default regex find/replace mode):
\R
and in the Replace field enter any character/string you would like to use to separate entries. Alternatively, if these Text fields become large, you can also convert them to the Long Text type, with data displayed in separate panes. - Use the standard GS-Base functions to search for field values, filter flagged records, etc. If you would like to verify files in multiple locations/disks, for example, to find file duplicates, create a few tables and use the Merge Records commands.
- You can use the Format > Hyperlink command to format the File path and Folder fields. Clicking or pressing Enter on a file name opens it in the associated program. Clicked folders are displayed for browsing.
- By default, dates are saved in the standard YYYY-MM-DDTHH:MM:SS format. To display them in one of the many available date/time formats, use the Format > Style command.
- Note: only folders and disks that are accessible (e.g. can be browsed in File Manager) from your Windows account can be scanned.
-
In calculated fields you can use the
=fileStats(file_path, tag)
formula/function to extract tens of various EXIF tags from your photos and images from entire disks and filter them, e.g., by the date a given photo was taken, its author, the place (via GPS), the camera settings, the software used to process it, etc.
It's a counterpart to the objectStats() function that does the same for objects/files inserted in Images/Files binary fields. Both are listed in the informational formula category.
Using objectStats() Functions to Obtain File/Image Data